Master Course in Distributed
Computing Systems Engineering
Workshop AW1
Module
EE 5029A
Object-Oriented Systems Design
Assignment 1
Introduction
to Java and the design of a graphical user interface with Swing
Marc Höschele
Contents
3. Design of the radio simulator
3.1. The Model View Controller conceptional
Design Pattern
4.2. The Listeners to Model changes
4.5. Conclusions for the implementation
5. Startup of a MVC based application
1. Introduction
This document will describe the Java language based on a small example application. This application is used to show the power of Java to build scalable, reliable and modularised software.
The example “Radio simulator” will be developed starting from the given Use Cases down to the Object-Oriented design and implementation in Java.
1.1. The radio simulator
The following picture shows the target application, a radio simulator.
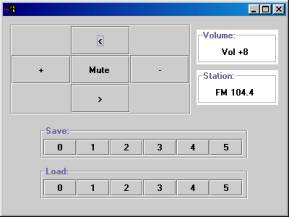
Figure 1: The radio simulator HCI
To implement this application, the described Object-Oriented design is implemented in Java 2.
2. Layout managers
This chapter analysis some of the available layout managers and explains how they are applied.
2.1. NullLayout
The NullLayout is the simplest layout manager available. It does simply place components to fixed given coordinates. It is not possible to dynamically resize the components in a container that uses the NullLayout. A resize of a container has no effect to the size and placement of the inner components.
This layout should not be used for modern HCI. Modern HCI are asked to run on many different screen dimensions – which would make it to small or to big for any other than the design-time screen dimensions.
2.2. BorderLayout
The BorderLayout is a simple but powerful layout manager that covers a lot of cases. It has the following placement possibilities:
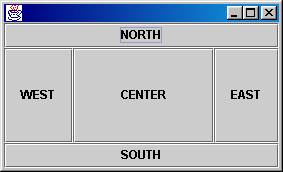
Figure 2: The possible placements in a BorderLayout
If one of the possible placements for components in a container using the BorderLayout is not used, the other components will grow so that there will be no empty space.
To add a component to such a layout in a container the placement has to be provided:
JFrame frame1 = new JFrame();
frame1.setLayout(new BorderLayout());
JEditorPane aEdit = new JEditorPane();
JButton aButton = new JButton(“OK”);
frame1.add(aEdit, BorderLayout.CENTER);
frame1.add(aButton, BorderLayout.SOUTH);
This will create a view similar to the following:
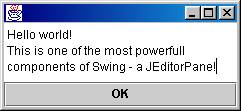
Figure 3: A small example for the BorderLayout
2.3. GridLayout
The GridLayout creates the given number of rows and columns with a fixed size. The size of each cell is exactly the size of the full height (or width) divided by the number of rows (or columns).
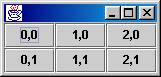
Figure 4: The placement in the GridLayout
The constructor is used the following way: new GridLayout(rows, columns). For the above example this would be: new GridLayout(2, 3).
Due to the fixed width a height of the cells this component is not necessarily a good solution to place components:
frame31.getContentPane().setLayout(new
java.awt.GridLayout(2, 3));
frame31.getContentPane().add(new JButton("<html><center>Sehr
hoher<br>Text</center></html>"));
frame31.getContentPane().add(new JButton("small"));
frame31.getContentPane().add(new JButton("wide, wider, the
widest???"));
frame31.getContentPane().add(new JButton("12"));
frame31.getContentPane().add(new JButton("23"));
frame31.getContentPane().add(new JButton("34"));
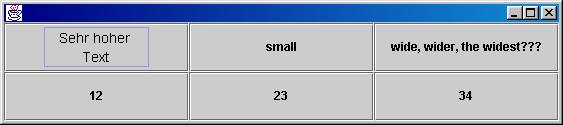
Figure 5: The grid uses the same height and width for each box
The components are added to the layout from left to right and from top to bottom.
An important new layout in Java 2 is the BoxLayout. The BoxLayout has the same features as the GridLayout but does not size all cells equal. It sizes the cells as necessary.
2.4. GridBagLayout
One of the most powerful but also most complex layout managers is the GridBagLayout – it offers a complete free placement and enlargement of all components in a container.
Each component added to a GridBagLayout has a set of constraints that define where this component will be placed (grid), where the anchor should be, how wide are the insets, how the size of the virtual box should zoom when the container is resized (weight) and how much rows and columns in relation to other components it needs (gridwidth), how it should zoom (fill), how it should be enlarged or minimized (ipad).
Therefore each component has a virtual box around which is defined by the GridBagConstraints. The box can resize independent to the component that is placed inside.
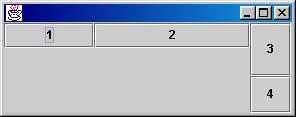
Figure 6: This is only possible using the GridBagLayout
The following source was used to create this view:
frame4.getContentPane().setLayout(new
java.awt.GridBagLayout());
java.awt.GridBagConstraints const1 = new java.awt.GridBagConstraints();
const1.gridwidth = 2;
const1.fill = java.awt.GridBagConstraints.HORIZONTAL;
const1.weightx = 0.3;
const1.anchor = java.awt.GridBagConstraints.NORTHWEST;
frame4.getContentPane().add(new JButton("1"), const1);
java.awt.GridBagConstraints const2 = new java.awt.GridBagConstraints();
const2.fill = java.awt.GridBagConstraints.HORIZONTAL;
const2.gridx = 2;
const2.weightx = 0.7;
const2.anchor = java.awt.GridBagConstraints.NORTHWEST;
frame4.getContentPane().add(new JButton("2"), const2);
java.awt.GridBagConstraints const3 = new java.awt.GridBagConstraints();
const3.gridheight = 2;
const3.gridx = 3;
const3.fill = java.awt.GridBagConstraints.VERTICAL;
const3.weighty = 0.7;
const3.anchor = java.awt.GridBagConstraints.SOUTHEAST;
frame4.getContentPane().add(new JButton("3"), const3);
java.awt.GridBagConstraints const4 = new java.awt.GridBagConstraints();
const4.gridx = 3;
const4.gridy = 3;
const4.fill = java.awt.GridBagConstraints.VERTICAL;
const4.weighty = 0.3;
const4.anchor = java.awt.GridBagConstraints.SOUTHEAST;
frame4.getContentPane().add(new JButton("4"), const4);
The following constraints are supported (not all used above):
· gridx, gridy – where in the virtual grid the component is placed
· gridwidth, gridheight – how wide and high is the box
· weightx, weighty – how much should the invisible box zoom in relation to others
· fill – in which direction should a component be zoomed
· anchor – where should be the placement of the component in the invisible box
· insets – for borders around a component
· ipadx, ipady – how much pixels should a component be enlarged/minimized
The placement of the various radio view elements in the window is an ideal candidate for the GridBagLayou – all components can be placed and enlarged as needed while still keeping all relations in nice shape.
3. Design of the radio simulator
To build a scalable application, it is absolutely necessary to separate the view and the data model. The Observer pattern could be used for this [1]. For this example design I have chosen does not use the Java 2 version of the Observable pattern – it does implement it completely by its own – to better illustrate the Model View Controller concept [2].
3.1. The Model View Controller conceptional Design Pattern

Diagram 1
This design was introduced in Smalltalk-80 [2]. As shown in the picture, the different parts of the radiosim application are already placed in suitable packages.
The packages used are based to the domain www.mhoesch.de. The resulting packages are:
de.mhoesch.radiosim.model - The data model
de.mhoesch.radiosim.view - All visible parts
de.mhoesch.radiosim.controller - The event listeners/handlers
de.mhoesch.radiosim - The startup code for model and view
3.1.1. The Model
The radio data-model is divided into the different parts that a radio represents: the volume control, the station control and the storage memory control.
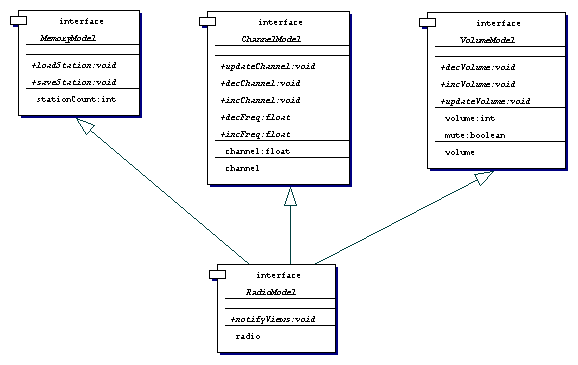
Diagram 2
This design enables a later distribution of the logically independent parts to different computers. For the design chosen here, there is also an interface providing access to all parts of the radio Object-Model that inherits from all free logical radio parts (multiple inheritance of interfaces).
3.1.2. The View
The view is also divided into its logical parts: Navigation, Volume display, Channel (frequency) display, saves to memory and load from memory.

Diagram 3
The view for the radio application is used to show inheritance in GUI elements. The VolumeDisplay, the ChannelDisplay, the LoadButtons and the SaveButtons both use a titled border but are different in colour; this offers the use of a BorderPanel abstraction. An additional abstraction layer – the abstract classes MemoryButtons and ValueDisplay do the change in colour.
The displays have similarities – the displays only differ in the text that is displayed. The buttons are mostly similar – the only difference is the title in the border and that the events thrown by them must be handled different.
All these GUI components are packed together in the RadioView – which by itself is not directly a frame. This enables the usage of the radio as a plug able module that can be placed into other panels. The RadioView and the RadioFrame both have no GUI functionality – they are only used as containers.
The RadioView has aggregations to all sub elements. They are added to the panel on a zero-to-many base. Each sub view can be placed zero to more than one time to the radio view. This is not necessary and not shown in the example implementation, but it is possible by design.
The RadioFrame has an aggregation to one RadioView – again this is also a zero-to-many aggregation as the frame could hold zero or many RadioViews.
3.1.3. The Controller
The controller implementations are used to handle all events coming from the different views.
Each view has a one-to-one aggregation to one instance of the corresponding controller. Each VolumeDisplay has exactly one VolumeController, each ChannelDisplay has exactly one ChannelController, each MemoryButtons view has exactly one MemoryController and each RadioFrame has exactly one RadioFrameController.
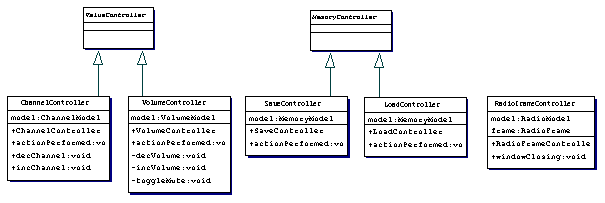
Diagram 4
As shown in the UML diagram above, a separate controller handles each logical unit of the display. The VolumeController and the VolumeChannel are very similar and thus inherit from an abstract class ValueController. The SaveController and the LoadController inherit from an abstract class MemoryController, as they are also very similar to another.
An exception is the so-called RadioFrameController, which is only used to handle events to the Frame – enabling it to handle the close button to shut down the application.
3.1.4. View conclusions
As the views are complete MVC components, they can be added in any order or number. This enables for example full functional volume only displays without adding any other line than
<<JavaContainer>>.add(new VolumeDisplay(<<Reference to VolumeModel>>);
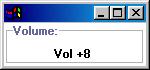
Figure 7: A separate VolumeDisplay
Another idea is to create a radio where the volume and the channels are predefined and the user is only allowed to select predefined radio-stations:
<<JavaContainer>>.setLayout(new
GridLayout(3, 1);
<<JavaContainer>>.add(new ChannelDisplay(<<Reference to
ChannelModel>>);
<<JavaContainer>>.add(new SaveButtons(<<Reference to
MemoryModel>>);
<<JavaContainer>>.add(new LoadButtons(<<Reference to
MemoryModel>>);
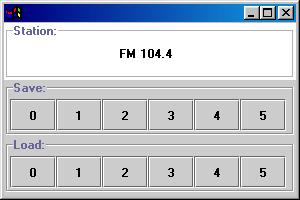
Figure 8: A mixture of a ChannelDisplay and the Memory controls
Any other combination, also with any number of doubles of any view is also possible but not shown here.
Without using the MVC concept this additional view would not be possible using only one to 4 lines of code.
4. Implementation
To implement the above shown design, it is only necessary to add a small amount of Java code into the found classes, interfaces and its dependencies. The skeleton given by the UML design is already almost complete – with a missing implementation of the radio model.
4.1. The RadioModel
The Radio model implementation is shown below:
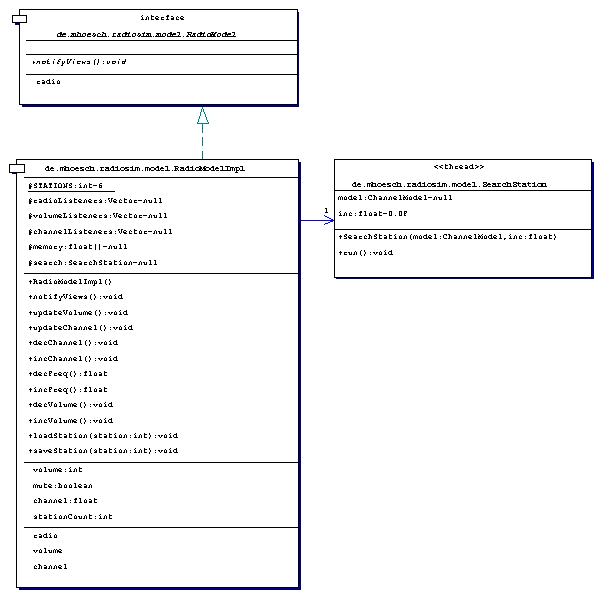
Diagram 5
The RadioModelImpl implements the RadioModel interface and thus has to offer implementations of all methods introduced in the interfaces (VolumeModel, ChannelModel and MemoryModel) that RadioModel extends.
An additional class that is aggregated by the RadioModelImpl was found during the design phase is the SearchStation – to increase or decrease the frequency in the display by steps of 0.1 it is necessary to return from the incChannel() and decChannel() methods immediately after invocation.
Swing is by itself not a multithreaded framework and thus everything is processed sequentially. The call to incChannel() and decChannel() must return to enable Swing to update the screen – but this does not conform to the requirement that wants to increase the frequency in steps by 0.1 in the display until the next station is reached.
The SearchStation class is extending Thread, which is invoked by each, a call to incChannel() and decChannel() to asynchronously call incFreq() and decFreq().
To ensure that not both are invoked, incFreq() and decFreq() it must be ensured that there is only one Thread at a time. That is done by a one-to-one aggregation.
4.2. The Listeners to Model changes
One thing not yet shown is the interfaces to call back the views – this is absolutely necessary to give the views a chance to follow changes in the radio model.

Diagram 6
It would have been enough to just implement an interface offering an update() method for all views, but then it would also be necessary for the views to call back the model to get the new values – a suitable concept if large amounts of data must be moved from the model to the view. But if only a small amount of data needs to be transferred from the model to the view, it is a good idea to add this values to the call updating the listeners.
4.3. The Views
The implementation of the views is a simple, straightforward implementation of the few missing lines in the already shown class-hierarchy – see source for details.
4.4. The Controllers
The implementation of the controller is a simple Java event handling. The events are fired by user event and are linked to these controllers that are created when the views are invoked.
/**
* The navigator gui.
*/
protected void initNavigator() {
GridLayout grid = new GridLayout(3,
3);
setLayout(grid);
setBorder(BorderFactory.createEtchedBorder());
model.addVolumeListener(this);
volumeControl = new
VolumeController(model);
channelControl = new
ChannelController(model);
down = new JButton("-");
down.addActionListener(volumeControl);
down.setActionCommand("DEC");
up = new JButton("+");
up.addActionListener(volumeControl);
up.setActionCommand("INC");
mute = new
JButton("Mute");
mute.addActionListener(volumeControl);
mute.setActionCommand("MUTE");
next = new
JButton(">");
next.addActionListener(channelControl);
next.setActionCommand("NEXT");
prev = new
JButton("<");
prev.addActionListener(channelControl);
prev.setActionCommand("PREV");
…
As shown in the source above, each GUI element action events are linked to an appropriate controller class that is invoked by the GUI element itself.
Each controller gets a reference to the Model (which is implicitly cast to VolumeModel or ChannelModel), not to the view. This reference is a one-to-one aggregation as defined during the design phase.
4.5. Conclusions for the implementation
As shown above, each part is separated from other parts of the radio simulator using interfaces.
Using this technique it is easy to implement a database for the channels, to separate the frequency tuner from the amplifier etc. and place them into different classes.
5. Startup of a MVC based application
What was not yet handled is the startup of the application – an instance of the model needs to be created and this model must be passed to the view(s). The views by themselves create new controllers for the events passed to them, which call the model.
The class de.mhoesch.radiosim.Radio has a main method, which does only call:
Radio radio = new Radio();
The constructor of the Radio class does nothing else than invoking the protected method (to enable overwriting in derived classes) startup().
/**
* Starts the radio simulator
application.
*/
protected void startup() {
RadioModel model = new RadioModelImpl(); // use Interface to access model
RadioFrame view1 = new RadioFrame(model); // One complete view
view1.show();
In the RadioFrame, a new RadioView object is instantiated – with again by itself does invoke the creation of the sub panels volume display, channel display, navigation, save-buttons and load-buttons.
/**
* default constructor for the radio
view
*/
public RadioView(RadioModel model) {
this.model = model;
initView();
}
The initView method includes the GridBagConstraints for the GridBagLayout chosen for the main container. Please refer to the source code for details.
All the sub panels use the much simpler GridLayout. This layout offers a static resizing grid, so that each button has exactly the same size.
The layout used for the volume and channel display is a BorderLayout – simply because of the “simplicity”. If something is added to the center of a BorderLayout and the other corners are left free, the component is enlarged to fill the complete space available.
[1] Erich
Gamma, Richard Helm, Ralph Johnson, John Vlissides. “Design Patterns – Elements
of Reusable Object-Oriented Software”
Addison Wesley, 1995
[2] Glenn
E. Krasner and Stephen T. Pope. “A cookbook for using the model-view controller
user interface paradigm in Smalltalk-80”
Journal of Object-Oriented Programming, August/September 1988